Project 2: Change is Hard
Paper to Pixel. Goal: Learn how to work with Flows, Wires and a Conscience.
Overview
- In week 2, you will form a team, pick a behavior design goal, and launch a diary study.
- In week 3, you will synthesize the results of the study into a journey map and plan out the flow of a design informed by the results.
- In week 4, you will refine this flow into a prototype that you can test
- In week 5, you will perform a field study of the prototype.
- In week 6, you will write up and deliver your findings
Part 1: Research the Opportunity Space
We will do a deeper dive into integrating research into design in P2.
First, form team of 3 people in your studio. The rules are simple: you can pick your own teams, but later, for P3, you will only be able to work with one member of your original P2 team. So think about what team you want for this project and the next.
Our focus in P2 is behavior change. To make this more interesting, we will focus only on behavior changes that people can do over a four-day behavior change sprint. Your design goal should be fully achievable during the four days, e.g.,
- Go to bed on time for four days in a row
- Read for fun each day
- Meet a new person each day
- Eliminate sugar and track energy levels
Rather than treating the four days as the start of a longer effort (e.g., lose weight, establish a routine of going to the gym), the object of this effort is learning what one is capable of and/or habit building.
Come with a team and a behavior change goal to Studio 2B.
As a team:
- Recruit eight people who are interested in the goal. Diary studies are notorious for having people drop out, and you want there to be at least five people who complete it.
- Perform a four-day diary study with each participant, capturing their thinking and behavior around the goal of interest. Think critically about what you will be asking them to keep track of in the diary — what is the most effective study protocol given your goals? You may want to have participants send you their entries at the end of each day so that you can read and process them incrementally.
- Capture the results in Google Docs, and familiarize yourself with them before studio.
- Bring the diaries with you to Studio 3A.
In Studio 3A, we will start working on synthesizing the diaries. The next steps are now:
- Conduct at least three follow-up interviews with diary study participants. Each team member should lead an interview, ideally accompanied by another teammate. Capture the interview by having one team member take notes or by recording the interaction and using rev.com. Make sure you read through any interviews you did not attend.
- Create journey maps individually (one per team member). Journey map video
- Bring the interview transcripts and journey maps with you to Studio 3B.
Part 2: Model the System & Ideate
Model
The goal is now to design a system that helps people achieve the behavior change goal. Don't start with screens — that's not what's important yet. How do you intercede with the user's motivation, ability, and trigger?
Your design may not be an app, and it may not even require a screen. Consider SMS (Twilio), Slack, or other surfaces that might nudge people.
First, use the analysis you did from your journey map to create a mindmap of potential elements.
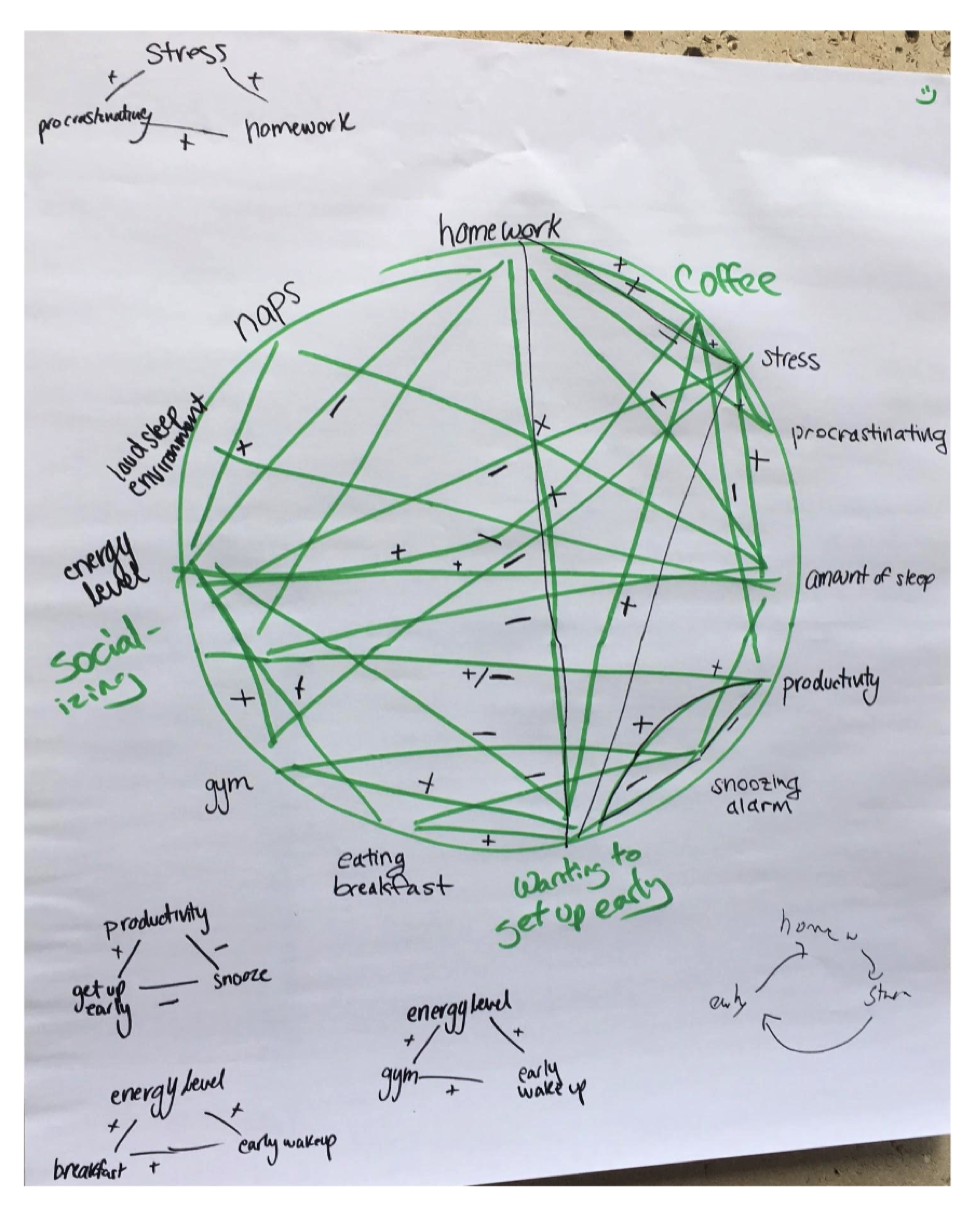
Second, create a system map (aka circle diagram) incorporating the main themes and actors from your mindmap to explore how people will move through the system. See this article for more info: "Tools for Systems Thinkers: Systems Mapping"
Review your system map and pull out the causal loops that are contributing to the habits you are exploring. Ask yourself if there are edges of loops that can be changed/removed/added to change the behavior loops you've observed. These are OPPORTUNITIES for you to introduce interventions.
Here are examples of systems maps from last quarter:

Ideate
Use the insights you gathered from your journey maps and from the systems maps to seed a brainstorm. Brainstorm at least 25 solutions and narrow down to 3 that you think could address the insights you’ve uncovered most effectively. Don’t choose a solution based on whether you like it or how safe it is -- choose based on how it directly relates to the insights you've uncovered about these causal behavior loops.
Storyboard
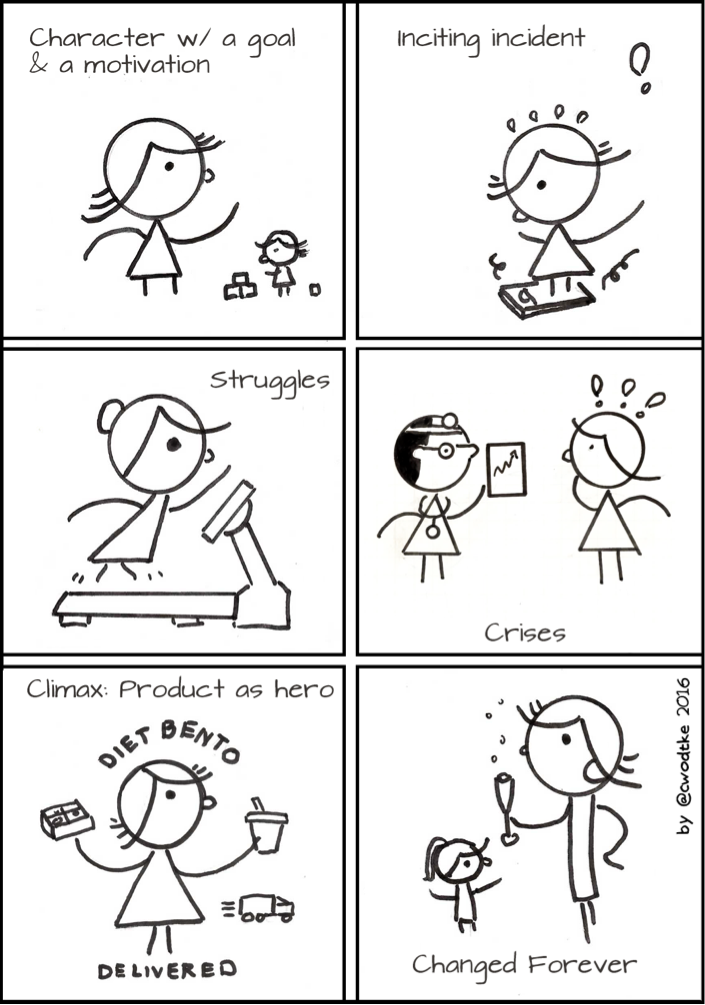
Finally, prototype to explore by creating a storyboard that communicates the idea that you've decided to explore further.
Create a storyboard for the main use case. It should describes the user, their challenge, and how the design influences their behavior. Use the 6 panel design we explored in studio.
Part 3: Specify the Interaction
Finally, we’ll expand the storyboard to a more concrete interface using the wireflows. To do so, first clarify for yourself: what question are you trying to answer with this prototype? Rather than creating a prototype of uniform depth across the entire system, articulate what is the biggest, riskiest, unanswered question about your design concept, and focus the prototype and your exploration of the interaction in the wireflow on answering just that question. Make a list of questions, stack rank them, and then select the one that you should answer first about the experience.
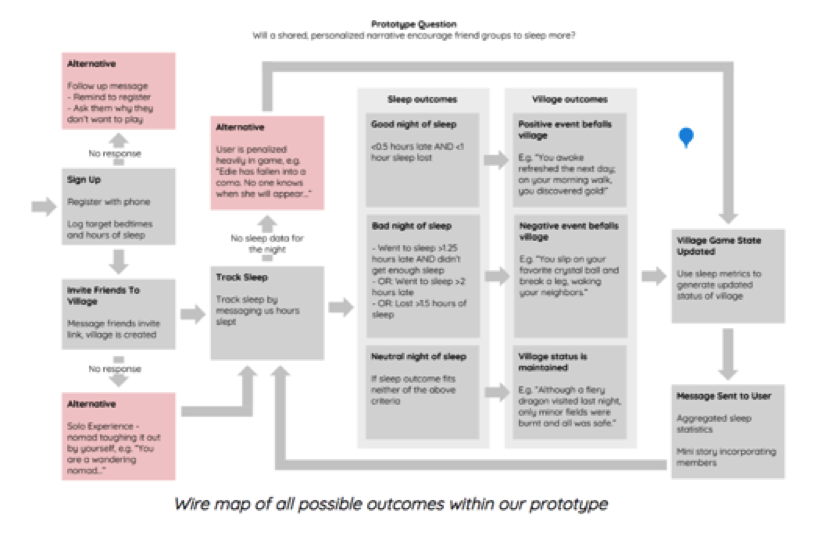
Armed with your question, create a wireflow of your design to answer it. A wireflow is an advanced technique that combines simple wireframes with flowcharts. See pages 38–40 of this description. If your experience doesn't have a UI, use the wireflow to communicate the interaction with the intervention you are proposing.
This requires thinking through dialogue design and parsing (if an SMS interface, for example.) What kind of conversational tone does the system have — a nanny, a friend, a cop? How do you ensure that the user's response is structured so that you can parse it out? Will it be important to capture whether they actually did the desired behavior?
Here is an example of a wireflow for an SMS experience:
Bring your prototype's question, a list of other questions you considered, and the wireflow that can help you answer the question, with you to studio 4B. One set per team.
Part 4: Field Study
Following feedback in studio 4B, your goal is to design a rapid experiment that addresses your design's biggest unanswered question. Start by reflecting on the biggest unanswered question that you previously articulated, and make sure that you can describe what kind of prototype you need to build to answer it.
We expect that for many projects, the prototypes may involve some small amount of coding. Remember that you don't have time to build a full app, so focus on how to hack a prototype that gets you feedback on the core question. For example, instead of an iOS app, you might do an SMS-based interface that uses the Twilio API and cron to ping users. Or, if your users keep Slack notifications on, you might build a minimal Slack bot that uses DMs and their buttons API.
You'll want to co-design your prototype with the experiment study plan. We don't expect a randomized study with multiple conditions here. However, before you start, think through what method will allow you to answer your prototype's question most directly. This requires thinking through:
- How will you recruit participants?
- What kind of training will users receive?
- What data will you record?
- What will you measure?
- What documents / artifacts need to be created to support the experiment?
- What interview questions will you ask participants at the conclusion of the study?
- What would you consider to be success? What is the most likely reason that the design might not achieve its goals?
- What will you discuss with the participants?
Here is an example of a worksheet filled out from last quarter.
Bring a first-draft prototype ready for peer usability testing, and your experimental worksheet for the field study method, to studio 5A. Your prototype may have wizard-of-oz'ed components rather than code depending on the needs of your experiment. You will use studio to test not just your prototype but the method for setting up your study with subjects as well to make sure that you test the whole process.
Iterate based on the peer feedback in studio, complete your prototype and revise your experiment method as needed.
Now launch your field study by executing the plan on your experiment worksheet. Document your observations, and synthesize them into high level findings. Support the findings with specific evidence and examples (e.g., quantitative data, quotes from interviews, behavior logs from the application). Specifically, include the following sections:
- Method: Describe who you recruited and how you recruited them; what process you had them follow; what you recorded, measured, and asked them in the follow-up interviews.
- Results: A high level description of what happened. For example: How did people engage with your design? What behaviors changed? Did they persist? What unanticipated secondary effects arose? Don't interpret the results or explain why they happened — focus on what happened.
- Discussion: A synthesis and interpretation of why the results came out the way they did.
- Reflection: What did you learn about your design? How might you change it, or pivot your design, if you were to continue?
Present your draft final report in studio 6A as a PPT presentation. This presentation will not be graded, but will be the best way to communicate your preliminary deliverables in studio to get feedback and answer any questions in class that you may have missed. Your 5-min presentation should have the following general outline.
- What problem are you solving?
- What did you learn through your diary study?
- What design did you end up prototyping?
- What were the results of your field study?
- What did you learn from those results?
Submit
A PDF with ALL your work and ideas documented with captions explaining your process.
Documentation contents:
- Research: Your documentation of the diary study, including your diary study plan and any materials you gave to participants, follow-up interviews and journey map.
- Flow and Interaction: Your description of the design you ended up choosing, and why. Include the mindmap, system map, design flow storyboards, and wireflow that led to it.
- Field Study: Your description of the field study and your synthesized findings: experiment worksheet documenting the method, any artifacts that communicate the prototype that you created, results of the study, discussion, reflection.
Submit on Canvas.
Grading rubric
This rubric will apply to the final submission. We put it here from the start so that you can see how the intermediate parts play into the final evaluation.
| Category | Scores | |||
|---|---|---|---|---|
Research 7pts |
[1 / 7pts]
Diary study does not correctly follow the method or is nonexistent
|
[3 / 7pts]
Diary study is incomplete or does not derive insights
|
[5 / 7pts]
Diary study is complete but focuses on surface-level insights about the habit
|
[7 / 7pts]
Diary study uncovers nontrivial insights about the habit
|
Flow and Interaction 7pts |
[1 / 7pts]
Design is incomplete or does not intervene on the habit
|
[3 / 7pts]
Design is not well targeted to change the habit
|
[5 / 7pts]
Design is moderately targeted to change the habit, but may not make realistic assumptions, or is too heavy-handed or light touch in its approach
|
[7 / 7pts]
Design represents a creative, effective intervention on the habit
|
Field Study 7pts |
[1 / 7pts]
Field study does not correctly follow the method or is nonexistent
|
[3 / 7pts]
Field study is incomplete or does not derive insights
|
[5 / 7pts]
Field study is complete but focuses on surface-level insights about the design and the habit
|
[7 / 7pts]
Field study uncovers nontrivial insights about the design and the habit
|
Documentation 4pts |
[1 / 4pts]
Documentation is vague, opaque, missing
|
[2 / 4pts]
Documentation is poor. All components are there but many are confusing. Many statements are not well supported or presented without any explanation
|
[3 / 4pts]
Documentation is uneven. Some areas are well documented and clear while others have minor problems in formatting, content, or polish
|
[4 / 4pts]
Documentation is concise and extremely clear. All pictures are captioned and/or annotated. It is easy to read and understand what happened and why and the arguments are well supported. There are not typos or grammatical errors. It is a joy to read
|
If any of the deliverables are missing, we will reduce your score by 25% per deliverable.